4G EPC & 5GNSA
4G EPC
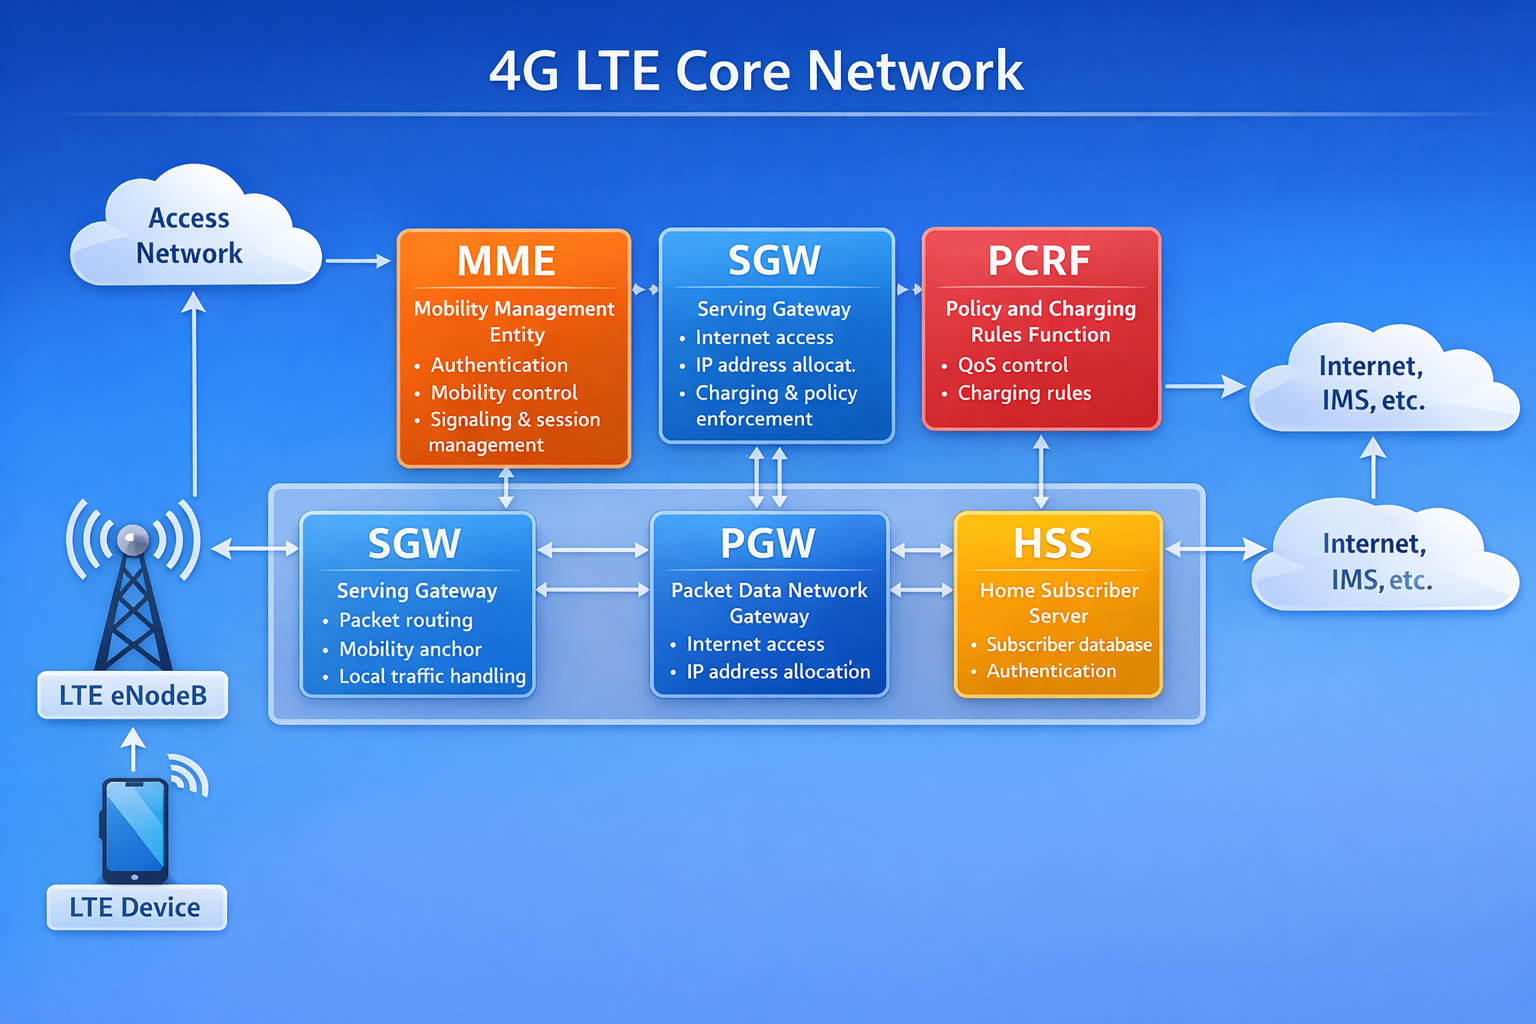
5GNSA


4G EPC & 5GNSA
4G EPC
5GNSA
Install the utility “iperf” or “iperf3” on both servers. Below here an example of install/using it on Alma9 linux server. On other distros it could be the same –
Install iperf/iperf3 using yum or dnf or apt –
#sudo yum install iperf3
Run iperf3 on the server –
top, htop, or mpstatuptime or check the output of top (the three numbers at the top-right).nproc).top or ps -eo pid,ppid,cmd,%mem,%cpu --sort=-%cpu.free -h or vmstat -s.free -h or swapon -s).top or ps -eo pid,ppid,cmd,%mem --sort=-%mem.df -h to check disk usage across filesystems.df -i to check inode utilization.iostat, iotop, or dstat./var/log/ for any disk-related errors.iftop, ip -s link, or netstat.ss or netstat to check open connections and ports.ping, traceroute, or mtr.vnstat, iftop, or nload.journalctl or /var/log/syslog (for system-wide events).dmesg or journalctl -k to check for hardware errors or warnings.uptime command provides server uptime and load averages.sar or atop.systemctl status <service> or service <service> status.ps aux | grep Z to list zombie processes.who, w, or last./var/log/secure or /var/log/auth.log.iptables -L or ufw status.ss -tuln or netstat -tuln.sensors (part of lm-sensors package).mdadm or vendor tools if RAID is configured.crontab -l or check /etc/crontab./var/log/syslog for cron-related logs.top, df, iostat, and log parsing can provide quick insights.By periodically reviewing these parameters, you can ensure the Linux server’s health and address potential issues proactively.
SD-WAN (Software-Defined Wide Area Network) is a modern approach to managing and optimizing wide area networks (WANs), allowing businesses to securely and efficiently connect remote offices, data centers, and cloud resources over the internet. Unlike traditional WANs, which rely on expensive, static MPLS (Multiprotocol Label Switching) circuits or leased lines, SD-WAN uses software to dynamically manage the traffic across multiple types of network connections, such as broadband internet, 4G/5G, MPLS, and other network types.
Centralized Control Plane:
Decentralized Data Plane:
Traffic Management and Routing:
Application-Aware Routing:
Security:
Cloud Integration:
Simplified Management:
Cost Efficiency:
Improved Performance:
Scalability:
Flexibility:
Security:
Cloud Optimization:
Centralized Control and Visibility:
SD-WAN is revolutionizing the way organizations manage their WANs by using software to dynamically manage traffic, optimize application performance, and reduce costs. It provides a more flexible, secure, and efficient solution compared to traditional WAN architectures, making it particularly well-suited for modern cloud-driven, distributed enterprise environments.
“journalctl” – is a command-line tool in Linux used to query and view logs managed by the systemd-journald service, which is part of the systemd system and service manager. journalctl allows users to access log data from various sources in a consolidated, searchable format, covering everything from kernel and system logs to application logs for services that run on systemd.
Here’s a quick overview of how to use journalctl:
1 .View All Logs:
journalctl
2. View Most Recent Logs:
journalctl -r
3 .Follow Logs in Real-Time (similar to tail -f):
journalctl -f
4. Specify a Service:
journalctl -u [service-name]
5. Filter by Time:
journalctl –since “YYYY-MM-DD HH:MM:SS” –until “YYYY-MM-DD HH:MM:SS”
journalctl –since “1 hour ago”
6. Filter by Priority:
journalctl -p [priority]
7. View Kernel Messages:
journalctl -k
8. Advanced Filtering:
journalctl -u nginx –since “2024-10-01” –until “2024-10-31” -p warning
Install TCPDUMP in ubuntu –
sudo apt-get install tcpdump
sudo yum install tcpdump
sudo tcpdump [options] [filter expression]
sudo tcpdump -i eth1
sudo tcpdump udp
sudo tcpdump port 80
sudo tcpdump dst port 80
sudo tcpdump src host 1.2.3.4
sudo tcpdump “src port 22” and “dst host 1.2.3.4” #Use and or or operator
sudo tcpdump “src port 22” or “src port 443”
tcpdump host 1.2.3.4 -w /home/users/demo/demo.dump
tcpdump -r /home/users/demo/demo.dump #read the raw file
MariaDB Database location
MySQL Locations
Mac /usr/local/mysql/bin
Windows /Program Files/MySQL/MySQL version/bin
Xampp /xampp/mysql/bin
Add mysql to your PATH
export PATH=${PATH}:/usr/local/mysql/bin
echo ‘export PATH=”/usr/local/mysql/bin:$PATH”‘ >> ~/.bash_profile
On Windows – https://www.qualitestgroup.com/resources/knowledge-center/how-to-guide/add-mysql-path-windows/
MariaDB config file (my.cnf) location
There is no specific command to find the location of “my.cnf” file. Can be in one of the following locations –
/etc/my.cnf
/etc/mysql/my.cnf
$MYSQL_HOME/my.cnf
[datadir]/my.cnf
~/.my.cnf
Login
mysql -u root -p
Check MySql & MariaDB Version
// From Linux bash shell
mysql –version
Mariadb -v
Or
From the MariaDB terminal>
show variables like “%version%”;
It will show detailed version information.
Check MariaDB Process List
SHOW PROCESSLIST;
Kill a MariaDB Process
KILL #ID;
//ID is the process ID.
Show Users
SELECT User, Host FROM mysql.user;
Create User
CREATE USER ‘someuser’@’localhost’ IDENTIFIED BY ‘somepassword’;
Grant All Priveleges On All Databases
GRANT ALL PRIVILEGES ON * . * TO ‘someuser’@’localhost’;
FLUSH PRIVILEGES;
List user and grants
SHOW GRANTS FOR ‘someuser’@’localhost’;
Remove Grants
REVOKE ALL PRIVILEGES, GRANT OPTION FROM ‘someuser’@’localhost’;
Delete User
DROP USER ‘someuser’@’localhost’;
Exit
exit;
Show Databases
SHOW DATABASES;
Create Database
CREATE DATABASE acme;
Delete Database
DROP DATABASE acme;
Select Database
USE acme;
Create Table
CREATE TABLE users(
id INT AUTO_INCREMENT,
first_name VARCHAR(100),
last_name VARCHAR(100),
email VARCHAR(50),
password VARCHAR(20),
location VARCHAR(100),
dept VARCHAR(100),
is_admin TINYINT(1),
register_date DATETIME,
PRIMARY KEY(id)
);
Drop a table
DROP TABLE tablename;
Show Tables
SHOW TABLES;
Insert Row / Record
INSERT INTO users (first_name, last_name, email, password, location, dept, is_admin, register_date) values (‘Brad’, ‘Traversy’, ‘brad@gmail.com’, ‘123456’,’Massachusetts’, ‘development’, 1, now());
Insert Multiple Rows
INSERT INTO users (first_name, last_name, email, password, location, dept, is_admin, register_date) values (‘Fred’, ‘Smith’, ‘fred@gmail.com’, ‘123456’, ‘New York’, ‘design’, 0, now()), (‘Sara’, ‘Watson’, ‘sara@gmail.com’, ‘123456’, ‘New York’, ‘design’, 0, now()),(‘Will’, ‘Jackson’, ‘will@yahoo.com’, ‘123456’, ‘Rhode Island’, ‘development’, 1, now()),(‘Paula’, ‘Johnson’, ‘paula@yahoo.com’, ‘123456’, ‘Massachusetts’, ‘sales’, 0, now()),(‘Tom’, ‘Spears’, ‘tom@yahoo.com’, ‘123456’, ‘Massachusetts’, ‘sales’, 0, now());
Select
SELECT * FROM users;
SELECT first_name, last_name FROM users;
Select with WHERE
SELECT * FROM users WHERE location=’Massachusetts’;
SELECT * FROM users WHERE location=’Massachusetts’ AND dept=’sales’;
SELECT * FROM users WHERE is_admin = 1;
SELECT * FROM users WHERE is_admin > 0;
Delete Row
DELETE FROM users WHERE id = 6;
Update Row
UPDATE users SET email = ‘freddy@gmail.com’ WHERE id = 2;
Add New Column
ALTER TABLE users ADD age VARCHAR(3);
Modify Column
ALTER TABLE users MODIFY COLUMN age INT(3);
Order By (Sort column)
SELECT * FROM users ORDER BY last_name ASC;
SELECT * FROM users ORDER BY last_name DESC;
Concatenate Columns
SELECT CONCAT(first_name, ‘ ‘, last_name) AS ‘Name’, dept FROM users;
Select Distinct Rows
SELECT DISTINCT location FROM users;
Select Between (Select Range)
SELECT * FROM users WHERE age BETWEEN 20 AND 25;
Select Like (Searching)
SELECT * FROM users WHERE dept LIKE ‘d%’;
SELECT * FROM users WHERE dept LIKE ‘dev%’;
SELECT * FROM users WHERE dept LIKE ‘%t’;
SELECT * FROM users WHERE dept LIKE ‘%e%’;
Select Not Like
SELECT * FROM users WHERE dept NOT LIKE ‘d%’;
IN
SELECT * FROM users WHERE dept IN (‘design’, ‘sales’);
Create & Remove Index
CREATE INDEX LIndex On users(location);
DROP INDEX LIndex ON users;
Create New Table with Foreign Key (Posts)
CREATE TABLE posts(
id INT AUTO_INCREMENT,
user_id INT,
title VARCHAR(100),
body TEXT,
publish_date DATETIME DEFAULT CURRENT_TIMESTAMP,
PRIMARY KEY(id),
FOREIGN KEY (user_id) REFERENCES users(id)
);
Add Data to Posts Table
INSERT INTO posts(user_id, title, body) VALUES (1, ‘Post One’, ‘This is post one’),(3, ‘Post Two’, ‘This is post two’),(1, ‘Post Three’, ‘This is post three’),(2, ‘Post Four’, ‘This is post four’),(5, ‘Post Five’, ‘This is post five’),(4, ‘Post Six’, ‘This is post six’),(2, ‘Post Seven’, ‘This is post seven’),(1, ‘Post Eight’, ‘This is post eight’),(3, ‘Post Nine’, ‘This is post none’),(4, ‘Post Ten’, ‘This is post ten’);
INNER JOIN
SELECT
users.first_name,
users.last_name,
posts.title,
posts.publish_date
FROM users
INNER JOIN posts
ON users.id = posts.user_id
ORDER BY posts.title;
New Table With 2 Foriegn Keys
CREATE TABLE comments (
id INT AUTO_INCREMENT,
post_id INT,
user_id INT,
body TEXT,
publish_date DATETIME DEFAULT CURRENT_TIMESTAMP,
PRIMARY KEY(id),
FOREIGN KEY(user_id) references users(id),
FOREIGN KEY(post_id) references posts(id)
);
Add Data to Comments Table
INSERT INTO comments(post_id, user_id, body) VALUES (1, 3, ‘This is comment one’),(2, 1, ‘This is comment two’),(5, 3, ‘This is comment three’),(2, 4, ‘This is comment four’),(1, 2, ‘This is comment five’),(3, 1, ‘This is comment six’),(3, 2, ‘This is comment six’),(5, 4, ‘This is comment seven’),(2, 3, ‘This is comment seven’);
Left Join
Left Join
SELECT
comments.body,
posts.title
FROM comments
LEFT JOIN posts ON posts.id = comments.post_id
ORDER BY posts.title;
Join Multiple Tables
SELECT
comments.body,
posts.title,
users.first_name,
users.last_name
FROM comments
INNER JOIN posts on posts.id = comments.post_id
INNER JOIN users on users.id = comments.user_id
ORDER BY posts.title;
Aggregate Functions
SELECT COUNT(id) FROM users;
SELECT MAX(age) FROM users;
SELECT MIN(age) FROM users;
SELECT SUM(age) FROM users;
SELECT UCASE(first_name), LCASE(last_name) FROM users;
Select Group By
SELECT age, COUNT(age) FROM users GROUP BY age;
SELECT age, COUNT(age) FROM users WHERE age > 20 GROUP BY age;
SELECT age, COUNT(age) FROM users GROUP BY age HAVING count(age) >=2;
A. Change hostname
$ hostnamectl set-hostname new-hostname
Check hostname
$ hostname
Reboot the server
B. Change IP Address
Find the following file – /etc/netplan/01-netcfg.yaml OR 50-cloud-init.yaml
Edit the IP/Interface info –
$ sudo chmod 600 /etc/netplan/01-netcfg.yaml
network:
  version: 2
  renderer: networkd
  ethernets:
    enp0s3:
      dhcp4: no
      addresses:
        - 192.168.1.10/24
      routes:
        - to: default
          via: 192.168.1.1
      nameservers:
        addresses: [8.8.8.8, 8.8.4.4]
Ensure that the Netplan configuration file permissions are secure to prevent unauthorized access.
$ sudo chmod 600 /etc/netplan/01-netcfg.yaml
Apply the configuration change
$ sudo netplan apply
Verify the ip address
$ ip a
[habib@localhost ~]$ sudo dmidecode -t system
Getting SMBIOS data from sysfs.
SMBIOS 2.8 present.
Handle 0x0100, DMI type 1, 27 bytes
System Information
Manufacturer: RDO
Product Name: OpenStack Compute
Version: 19.3.2-1.el7
Serial Number: 9b3570ed-2a79-4c7d-91b8-f4fad8c4ec52
UUID: 9b3570ed-2a79-4c7d-91b8-f4fad8c4ec52
Wake-up Type: Power Switch
SKU Number: Not Specified
Family: Virtual Machine
Handle 0x2000, DMI type 32, 11 bytes
System Boot Information
Status: No errors detected
[habib@localhost ~]$